
Rain Gardens are incredibly practical and beautiful ways to deal with water issues in your yard while helping to preserve a healthy water supply and habitat for animal life.

A Rain Garden is basically a tub shaped garden into which rain water is redirected. The plants in a rain garden help to process water runoff back into the ground while purifying it of any pollutants it may have picked up. Species of plants are chosen and located based on the amount of water that is expected to pool in the bed when it rains and their location within the bed. In other words, water loving plants are placed in the center of the bed, with more dry-loving plants lining the sides. Native plants that can handle both flood and drought are often prioritized for all areas unless the ground is constantly wet.
The initial work of installing a rain garden is substantial, but not significantly more involved than installing any other garden bed. Once the garden is fully established, it is remarkably low maintenance and demands few resources. The plants are arranged so that, once they are fully grown, they take over the space in the garden. This eliminates opportunities for pesky weeds to grow. Additionally, because the garden bed self-waters during rains and the plants selected can tolerate drought, these gardens require very little extra watering, particularly if planted in the fall or early spring. This conserves water, limits water bills and saves gardeners time.
I began to work on my rain garden last fall when I recognized that the lawn was particularly dry and I did not want to be spending time and excessive money keeping it alive. However since the home is in the center of the town and beach activity, something needed to be done to enhance the curb appeal. In addition, since the house is right up the hill from one of the Great Lakes, I did not want pollution from our property running down the hill and into the lake. Finally, I did not like how close to the house our downspouts dumped, though this was necessary because of the narrow lot.

I was unsure of whether I should put a rain garden on both sides of the walkway, or only on the left side, which had easy access to an additional downspout and would be able to filter the water from both our covered porch and half of our roof. The decision was made for me when I called 8-1-1 to find out what was underneath the lawn.

As you can see, the inspectors came out and found that our gas line runs almost through the middle of the right-hand yard. Since rain gardens require a significant amount of digging, placing one here was out of the question.
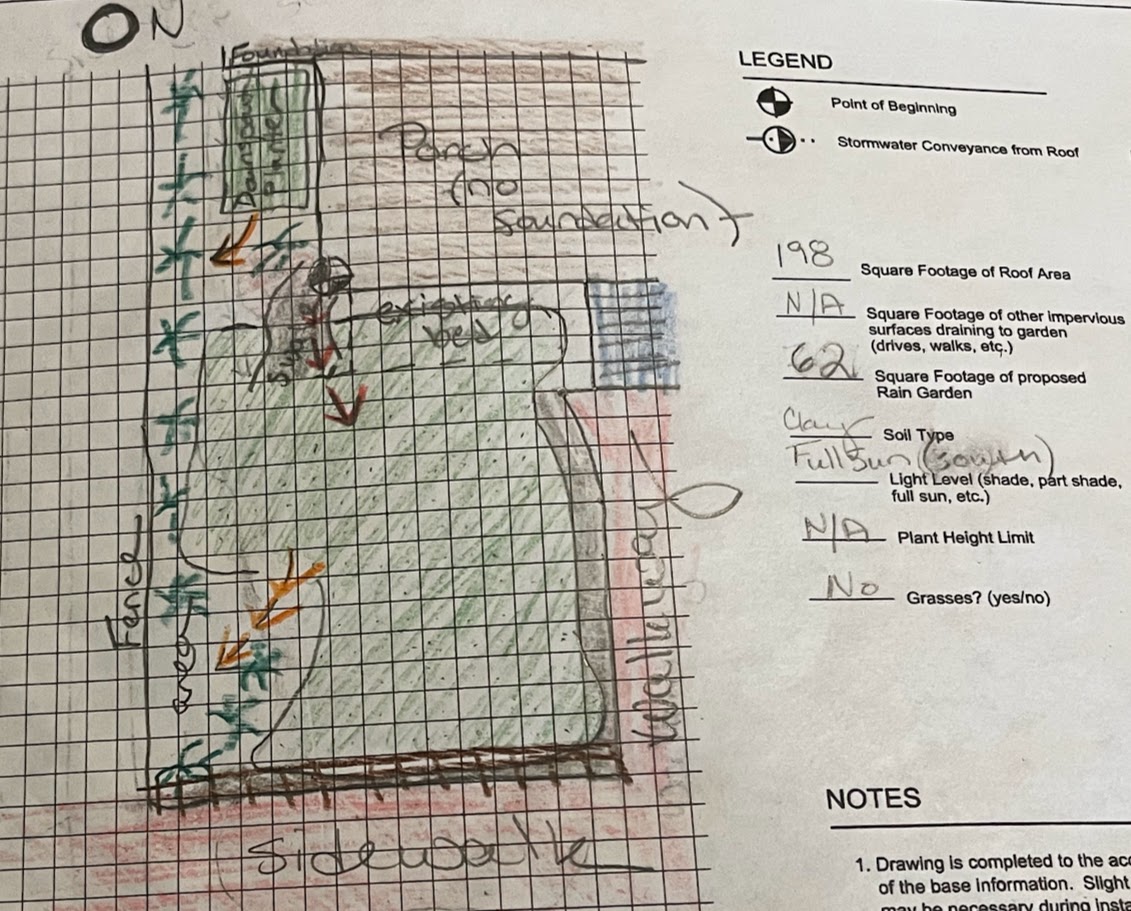
Once I had determined where to put the garden, it was time to start designing it! I used a piece of graph paper having each square to represent a square foot. I also cheated a bit and did some measurements of the garden and roof using google maps since we had not yet moved into the home. By planning it this way, I started out with a wealth of information: how much surface area would be draining into the bed, how much soil I would need, how much mulch to buy, and best of all, how many plants I would require.
Once I knew the surface area of both the garden and my drainage area (the roof) I needed one additional piece of information: how quickly did my soil drain? To find out, I had to do a percolation test. I dug a small hole in the middle of the where I intended to dig that went down about two feet. I filled the hole with water, waited for it to drain and then filled it again. Then I waited for the hole to empty. In my case, the hole did not drain within twenty-four hours so I knew that I needed to dig the garden bed to be three inches deep. I also knew that the garden needed to have an area that was at least 30% of the area of the drainage area. If it had drained within the twenty-four hour period, I would have needed to dig four to six inches deep and make the area of the garden 20% of the area of the drainage area. I am not sure why it works like this, but whoever came up with the calculations seems to have done a good job!
Due to space constraints (the garden had to be at least 10 feet from my yard and my property line), my bed was a little too small for the drainage area. However, the numbers were awfully close and, since the downspouts were basically just dropping water between the foundations of two homes, redirecting the water to the front yard would only help to solve the problem. If there was a risk of water running towards my foundation, the sidewalk, or the neighbors yard, I would have had to rethink my plans – one of a rain gardener’s goals is to “do no harm.”
Fortunately, I got the go ahead from my instructors and could recruit my kids for the garden’s installation!
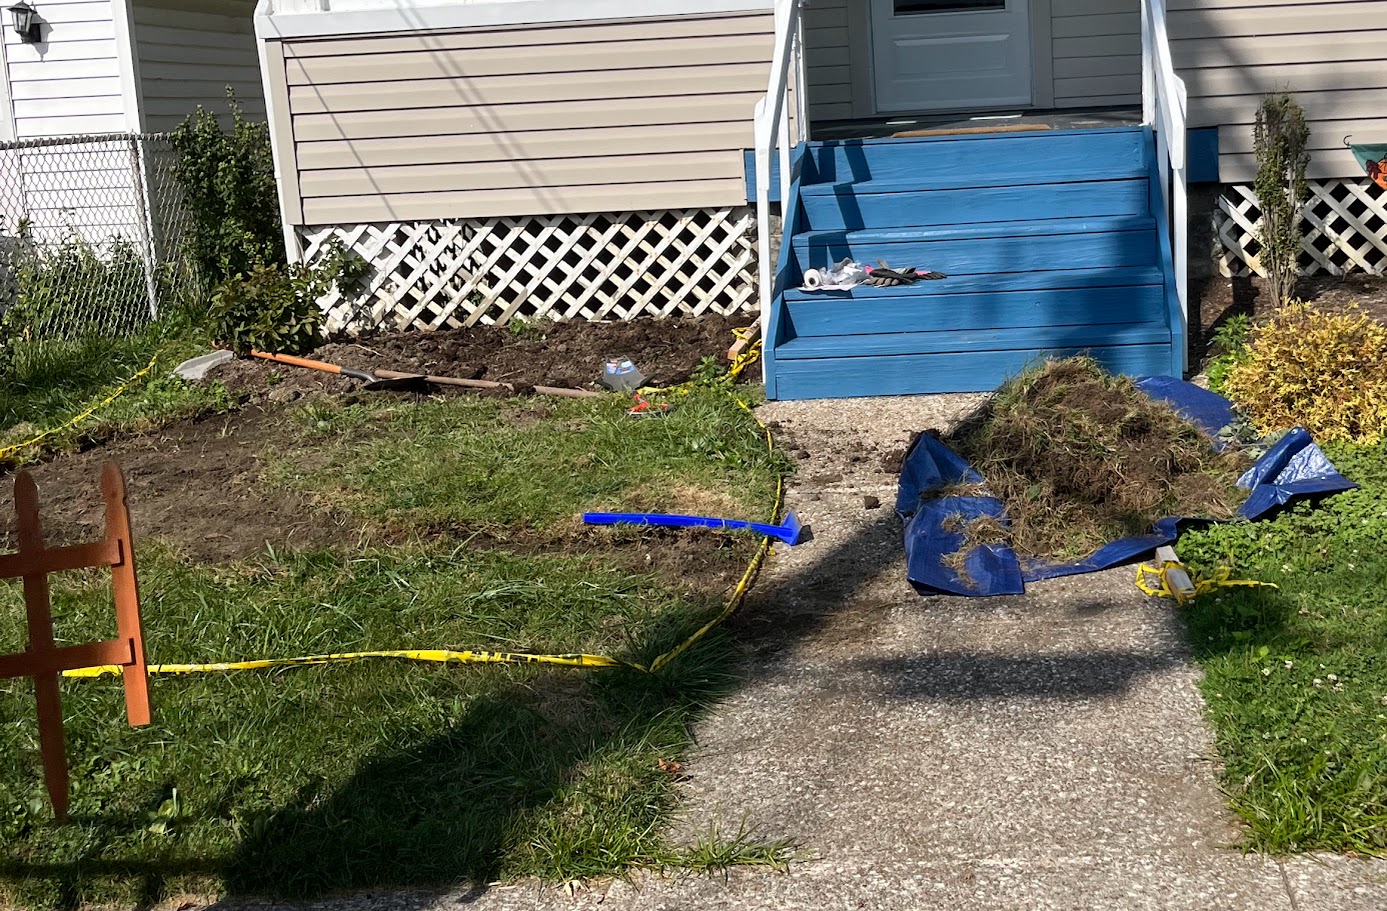
We started in mid-fall. I began by laying down tape to let us know exactly where the garden should go. Then we began the exhausting task of removing the sod – but we didn’t throw it out – we saved it on a tarp for later. Once we had dug down the required three inches and made sure that the bed was completely flat in the center, it was time to start building up the berm that runs along the edges of the bed. The berm is important because it keeps the water in the pool area long enough that the plants can process it. The berm surrounds all of the sides of the garden except for a small gap where the water enters (this should be slightly elevated and flow down hill towards the garden) and the overflow area (this is about a foot wide lowering of the berm which will direct water in the right direction if the bed becomes too full). I lined the entry and overflow areas with gravel, then piled the sod we had removed from the garden along its edges to create the berm. My kids enjoyed running around to pack it down and by the spring, the grass had grown in to hold it all together.

Then it was time to add the soil back into the bed. We added four inches of topsoil followed by two inches of compost and then mixed it. This filled the bed with soil that was now loose and ready to hold water and plant roots. We topped the area with a layer of mulch so that we would not have to mulch around the plants and to help hold water in the soil. Finally, it was time to lay the plants out and see how they would look in the places I had planned for them! Once I was satisfied, we started digging and plopping those shoots into their spots.

The garden did well over the winter and was surprisingly happy come spring. In fact, during the spring, it was only manually watered once and that was just because I was watering the newly installed bed on the other side of the yard and decided to do both. Basically, it has self-watered even with some dry 80 degree weather! There are a significant number of weeds this year since it has not yet filled in, but it will get easier each year. I expect that by year three it will be basically on autopilot.

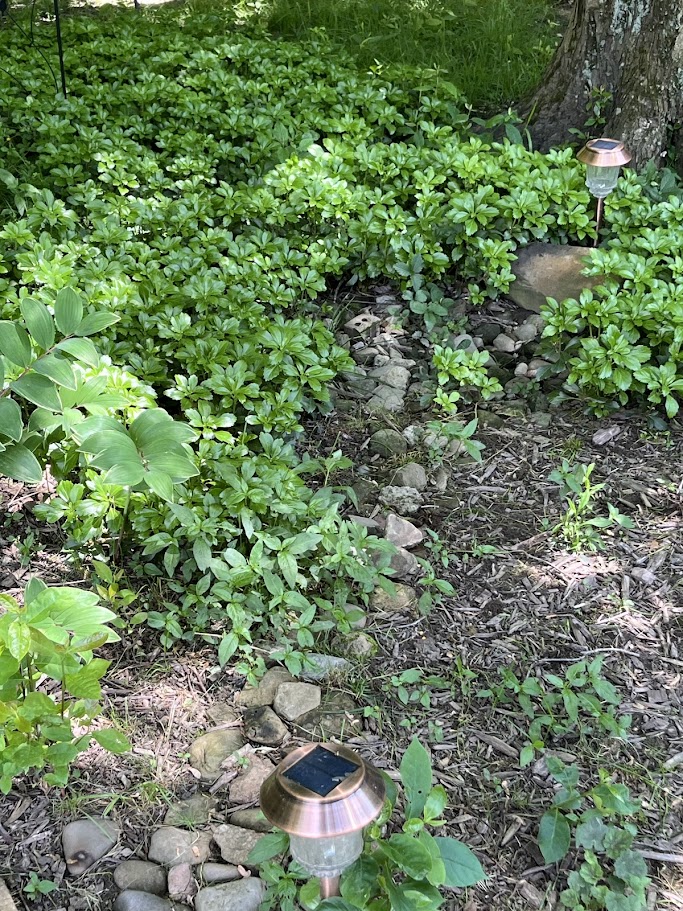
As you can see, a true rain garden takes a lot of work to set up and has some very specific site requirements that don’t always work. For example, in part of our yard, the ground was a mud pit in the spring, hard as rock in the summer, and full of roots all year round. The roots prevented me from installing a true rain garden in that spot, since the required digging would damage the trees. Regrading the area wasn’t an option since it would force water back into our foundation or onto our neighbors yard. However, by digging down slightly to redirect the majority of water into shallow basins that I lined with rock I was able to turn these dangerously tempting play areas into delightful and intentional looking garden spaces that boast plants that thrive in that environment.

along with the rock pool and plantings.
So, if you aren’t looking to build a certified rain garden, there is no reason why you can’t use a less structured method to direct, pool and utilize water in problematic patches of your yard! It will likely require significantly less work and still offer you beautiful and practical landscaping options.


